There’s a special kind of magic that happens when you enjoy a scoop of perfectly churned, creamy ice cream. But what if that magic could happen right in your own kitchen, with minimal fuss and maximum flavor? At “Kem Hạnh Phúc,” we believe everyone deserves to experience the sheer joy of homemade frozen treats. Gone are the days of laborious hand-cranking and complicated setups. Thanks to the evolution of the Easy Ice Cream Maker, crafting your own gourmet desserts is simpler and more accessible than ever before.
Imagine a world where you control every ingredient, where dietary needs are met with a smile, and where unique flavors are just a whim away. That’s the promise of an easy ice cream maker, a tool that transforms ordinary ingredients into extraordinary moments of happiness. Let’s dive into how these ingenious machines work and how you can pick the perfect one to start your own sweet adventure.
A Sweet History: The Evolution of Ice Cream Making at Home
For centuries, ice cream was a luxury, its creation a labor-intensive affair involving large tubs of ice and salt, and hours of hand-churning. The process, while yielding delicious results, was often reserved for special occasions and large gatherings, requiring significant effort and a dedicated team. Fast forward to today, and the modern easy ice cream maker has revolutionized home dessert making. Advances in technology have brought us compact, efficient appliances that take the guesswork and muscle out of churning, bringing the joy of fresh, homemade ice cream to everyday life. These machines embody our “Kem Hạnh Phúc” philosophy: making happiness easy to create.
Understanding Your Options: Types of Easy Ice Cream Makers
When it comes to choosing an easy ice cream maker, you’ll find a few main types, each offering its own blend of convenience and capability. Understanding these differences will help you select the perfect companion for your homemade dessert journey.
Freezer Bowl Machines
These are perhaps the most common and budget-friendly easy ice cream makers, exemplified by popular models like the Cuisinart Pure Indulgence. They consist of a base that houses a motor and a double-walled bowl filled with a special freezing liquid.
How They Work: You simply freeze the inner bowl for 15 to 24 hours before you plan to make ice cream. Once the bowl is rock-solid frozen, you assemble the machine, pour in your chilled ice cream base, and let the motor churn the mixture against the cold walls. In about 20-30 minutes, you’ll have soft-serve consistency ice cream.
Pros:
- Affordable: Generally the most economical option, making them a great entry point into homemade ice cream.
- Simple Operation: Usually just an on/off switch, making them incredibly straightforward to use.
- Compact: Many models are relatively small, fitting easily into most kitchen cabinets.
Cons:
- Pre-Freezing Required: The need to pre-freeze the bowl means you can’t make ice cream on a whim.
- Single Batch: You typically can only make one batch at a time before the bowl needs re-freezing.
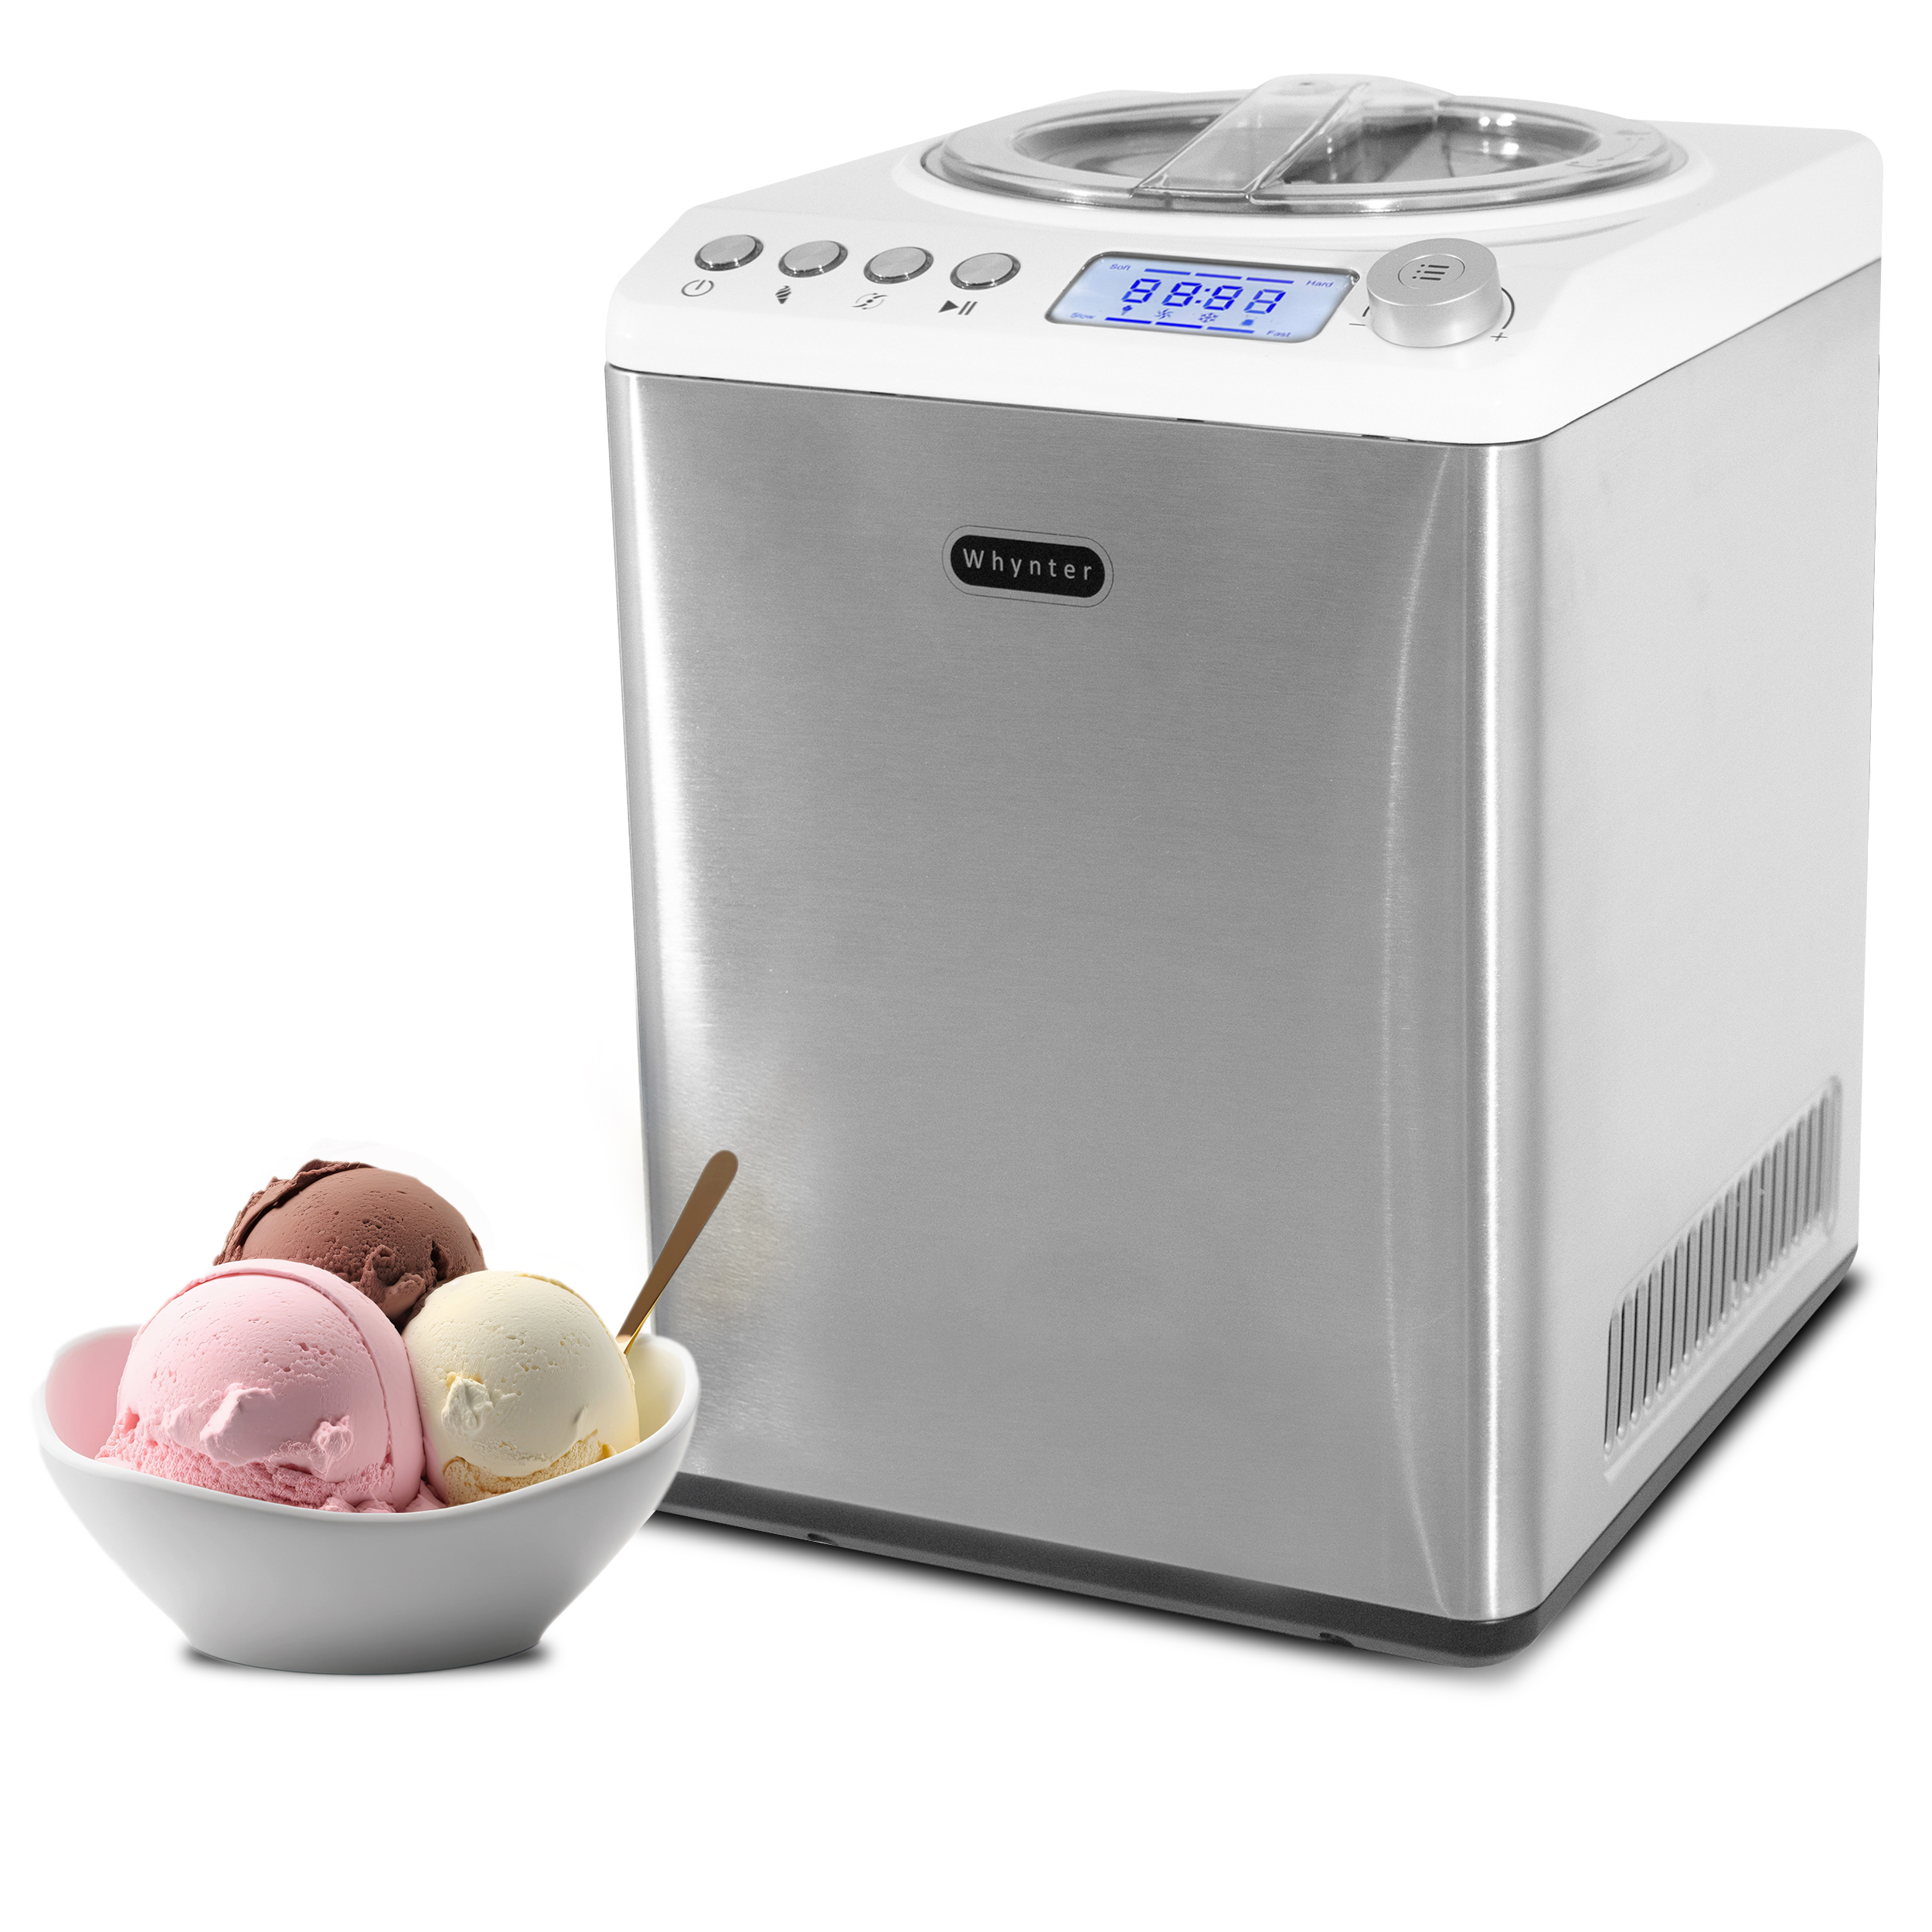
Compressor Machines
For those who crave spontaneity and continuous batches, a compressor easy ice cream maker is a game-changer. Models like the Whynter Automatic Compressor Ice Cream Maker are often highlighted for their convenience.
How They Work: These machines have a built-in freezer, much like a miniature refrigerator. You simply add your ingredients, select your setting, and the machine chills and churns simultaneously—no pre-freezing necessary. In less than an hour, you can have fresh ice cream ready to enjoy.
Pros:
- No Pre-Freezing: The ultimate in convenience; make ice cream whenever the craving strikes.
- Continuous Batches: Ideal for parties or if you want to experiment with multiple flavors, as you can make batch after batch.
- More Control: Often offer various settings for different frozen desserts like gelato, sorbet, or frozen yogurt.
Cons:
- Higher Cost: Significantly more expensive than freezer bowl models.
- Larger Footprint: Due to the internal compressor, these machines tend to be heavier and take up more counter space.
The Ninja Creami: A Unique Approach to Easy Ice Cream
The Ninja Creami Deluxe stands out as a unique and popular easy ice cream maker for its innovative method.
How It Works: Unlike other machines, with the Ninja Creami, you freeze your entire base mixture in special containers for 24 hours. Once frozen solid, the machine’s powerful blade shaves and whips the mixture into a creamy, airy consistency in just about 5 minutes.
Pros:
- Versatility: Can make ice cream, frozen yogurt, gelato, sorbet, smoothie bowls, and more with different presets.
- Speed of Churning: Once the base is frozen, the actual churning process is remarkably fast.
- Easy Cleanup: Many removable parts are dishwasher-safe.
Cons:
- Pre-Freezing of Base: Requires significant advance planning to freeze the mixture itself.
- Mix-in Handling: Softer mix-ins might get broken down by the blade rather than remaining in chunks.
- Noise: Some users report it can be quite loud during operation.
Stand Mixer Attachments
If you already own a stand mixer, an ice cream maker attachment is a clever, space-saving option.
How They Work: Similar to freezer bowl machines, these attachments require you to pre-freeze an insulated bowl (typically for at least 15 hours). Once frozen, the bowl attaches to your stand mixer, and the mixer’s power takes care of the churning.
Pros:
- Space-Saving: No need for an entirely separate appliance if you already have a stand mixer.
- Intuitive Use: Familiarity with your stand mixer makes this attachment easy to operate.
Cons:
- Pre-Freezing Required: Just like freezer bowl models, advance planning is essential.
Getting Started: How to Use Your Easy Ice Cream Maker
Regardless of the type of easy ice cream maker you choose, the fundamental steps to delicious homemade ice cream are surprisingly simple.
1. Prep Your Ice Cream Base
This is where the magic truly begins! Most ice cream bases consist of cream, milk, and sugar, with some recipes including eggs for a richer “frozen custard.”
- Chill Thoroughly: For the best results, always ensure your ice cream base is thoroughly chilled—ideally overnight in the refrigerator. Warm ingredients can prevent proper thickening and lead to an icy texture.
2. Assemble Your Machine & Churn
Once your base is cold and your freezer bowl (if applicable) is frozen solid:
- Assembly: Place the frozen bowl into the machine base, attach the churning paddle, and secure the lid.
- Start the Motor FIRST: For freezer bowl and stand mixer attachment models, it’s crucial to turn the machine ON before pouring in your mixture. This prevents the base from instantly freezing to the sides of the cold bowl, which can result in uneven freezing and potential damage to the machine.
- Pour and Watch: Slowly pour your chilled ice cream base through the opening in the lid while the machine is running.
- Churn Time: Let your machine churn for about 20-40 minutes, depending on the model and desired consistency. The mixture will thicken and increase in volume, reaching a soft-serve texture.
3. Add Mix-ins (Optional)
If you love chunks of chocolate, fruit, or nuts in your ice cream, add them during the last 5-10 minutes of churning. This ensures they are evenly distributed without being over-processed.
4. Perfecting the Consistency
Straight out of the machine, homemade ice cream will typically have a soft, creamy, almost soft-serve consistency. If you prefer a firmer scoop:
- Chill for Hardening: Transfer your freshly churned ice cream to an airtight, freezer-safe container and freeze for at least 2-4 hours.
Tips for Success: Unlock Your Inner “Kem Hạnh Phúc” Chef
Making delicious homemade ice cream with an easy ice cream maker is a rewarding experience. Here are some expert tips to ensure every batch is a triumph:
- Always Start with Cold Ingredients: This cannot be stressed enough. The colder your base, the faster and more efficiently your ice cream maker can churn, resulting in a smoother, creamier final product.
- Don’t Overfill: Ice cream expands as air is incorporated during churning. Always follow your machine’s capacity guidelines to prevent overflows.
- Mind Your Mix-ins: While the Ninja Creami might break down softer additions, for traditional churners, avoid excessively large or hard chunks that could damage the paddle.
- Patience for Firmness: Remember that homemade ice cream, without commercial stabilizers, freezes much harder. Take it out of the freezer 10-15 minutes before serving for perfect scooping.
- Embrace Experimentation: Don’t be afraid to try new flavors! From classic vanilla bean with a hint of lavender to a bold mango-chili sorbet, your easy ice cream maker is your canvas.
“The joy of creating your own gourmet ice cream at home is truly unparalleled, and with today’s easy ice cream makers, it’s more accessible than ever before,” says Sarah Jenkins, a seasoned home chef and “Kem Hạnh Phúc” ice cream enthusiast. “It’s not just about the dessert; it’s about the creativity and the delicious memories you make.”
More Than Just Dessert: The Benefits of Homemade Ice Cream
Beyond the sheer delight of a cold, sweet treat, owning an easy ice cream maker brings a host of benefits to your kitchen and lifestyle:
- Control Over Ingredients: This is a major advantage. You can avoid artificial additives, excessive sugar, and preservatives commonly found in store-bought options. This control also means you can cater to dietary needs, creating dairy-free, sugar-free, or vegan options effortlessly.
- Unmatched Freshness and Flavor: Homemade ice cream offers a superior taste and texture because it’s enjoyed at its peak freshness. The flavors are brighter and more authentic without the need for stabilizers that can dull the taste.
- Cost-Effectiveness: While there’s an initial investment, making your own ice cream can be more economical in the long run, especially if you enjoy premium or gourmet flavors regularly.
- Fun and Engaging Activity: Making ice cream at home can be a delightful activity for the whole family, fostering creativity and a love for cooking.
- Customization: The possibilities are endless! You can create unique flavor combinations you’d never find in a store, making every batch a personalized culinary adventure.
Troubleshooting Common “Scoop” Ups
Even with an easy ice cream maker, you might encounter a few common hiccups. Here’s how to troubleshoot them:
My Ice Cream is Too Soft
Why it happens: This often occurs if your ice cream base wasn’t sufficiently chilled or if the freezer bowl (for non-compressor models) wasn’t completely frozen. Overfilling the machine can also hinder proper freezing.
The fix: Ensure your base chills in the refrigerator for at least 4-6 hours, or ideally overnight. For freezer bowl models, check that the bowl has been in the freezer for the recommended 15-24 hours and that you hear no sloshing liquid if you shake it. Don’t overfill the canister beyond the indicated fill line.
My Ice Cream is Hard as a Rock
Why it happens: Homemade ice cream typically freezes harder than commercial varieties because it lacks the stabilizers and high air content (overrun) of store-bought ice cream.
The fix: Simply let your homemade ice cream sit at room temperature for about 10-15 minutes before scooping. This brief softening period will make it perfectly scoopable.
Uneven Freezing
Why it happens: This can be due to an improperly chilled base, an overfilled machine, or the base being added before the motor started (for freezer bowl types).
The fix: Double-check that your base is very cold and that you haven’t exceeded the machine’s capacity. Always ensure the motor is running before slowly pouring the mixture into the freezer bowl to prevent immediate freezing on the sides.
Creative Flavors & Serving Ideas
With your easy ice cream maker, the world of flavors is your oyster.
- Beyond Vanilla: Infuse your vanilla base with lavender, cardamom, or a hint of smoked sea salt for an elevated twist.
- Fruit-Forward Delights: Blend seasonal fruits like ripe peaches, berries, or mangoes into your base for vibrant sorbets or creamy fruit ice creams.
- Gourmet Infusions: Experiment with unexpected additions like basil, rosemary, or even a splash of your favorite liqueur (added at the very end of churning for best results).
- Mix-in Madness: From crushed cookies and brownies to toasted nuts, mini marshmallows, or swirls of caramel and fudge, customize to your heart’s content.
- Serving Suggestions: Don’t just scoop! Serve your creations in homemade waffle cones, as an à la mode accompaniment to pies and crumbles, or create decadent sundaes with your favorite toppings.
Frequently Asked Questions
How long does homemade ice cream last in the freezer?
Properly stored in an airtight container, homemade ice cream can last for about 1 month in the freezer. Beyond that, its quality may start to degrade.
Can I make dairy-free ice cream with an easy ice cream maker?
Absolutely! Many recipes substitute dairy milk and cream with coconut milk, almond milk, or cashew cream to create delicious dairy-free and vegan frozen desserts. The versatility of an easy ice cream maker shines here, allowing you to tailor ingredients to any dietary preference.
What are the essential ingredients for a basic ice cream recipe?
The most fundamental ice cream recipes typically require heavy cream, whole milk, and sugar. From this simple base, you can add vanilla extract, cocoa powder, fruits, or any other flavorings to create endless variations.
Conclusion
Embracing an easy ice cream maker means opening the door to a world of culinary creativity and delightful moments. At “Kem Hạnh Phúc,” we’re passionate about making the art of ice cream making accessible to everyone, transforming your kitchen into a hub of sweet innovation. Whether you’re a seasoned chef or a curious beginner, these convenient machines empower you to craft personalized, fresh, and utterly delicious frozen treats. So, choose your perfect easy ice cream maker, gather your favorite ingredients, and embark on your own joyous journey of homemade happiness. Your taste buds—and your loved ones—will thank you!