There’s something uniquely satisfying about crafting your own frozen treats, and with a pint ice cream maker, that joy becomes incredibly accessible. If you’re like me, your pint ice cream maker isn’t just an appliance; it’s a gateway to personalized indulgence, allowing you to whip up perfect portions of creamy, dreamy ice cream, sorbet, or gelato right in your own kitchen. Let’s dive into making the most of this fantastic little machine!
The Rise of Personal Frozen Treats: A Brief History of Pint Ice Cream Makers
Remember when making ice cream at home meant hauling out a bulky machine, wrestling with rock salt and ice, or committing to a gallon-sized batch? Those days are happily behind us, thanks to the ingenious evolution of the pint ice cream maker. These compact marvels emerged from a desire for convenience, portion control, and endless flavor experimentation without the commitment of a huge batch. They’ve perfectly captured the trend of personalizing our culinary experiences, fitting seamlessly into smaller kitchens and busy lifestyles. Now, a spontaneous craving for a custom flavor is just minutes away from becoming a reality, cementing the pint maker’s place as a beloved kitchen staple.
How Your Pint Ice Cream Maker Works Its Magic
At its heart, making ice cream is about transforming a liquid base into a creamy solid by rapidly chilling and incorporating air. Your pint ice cream maker excels at this process in a compact form.
Types of Pint Ice Cream Makers
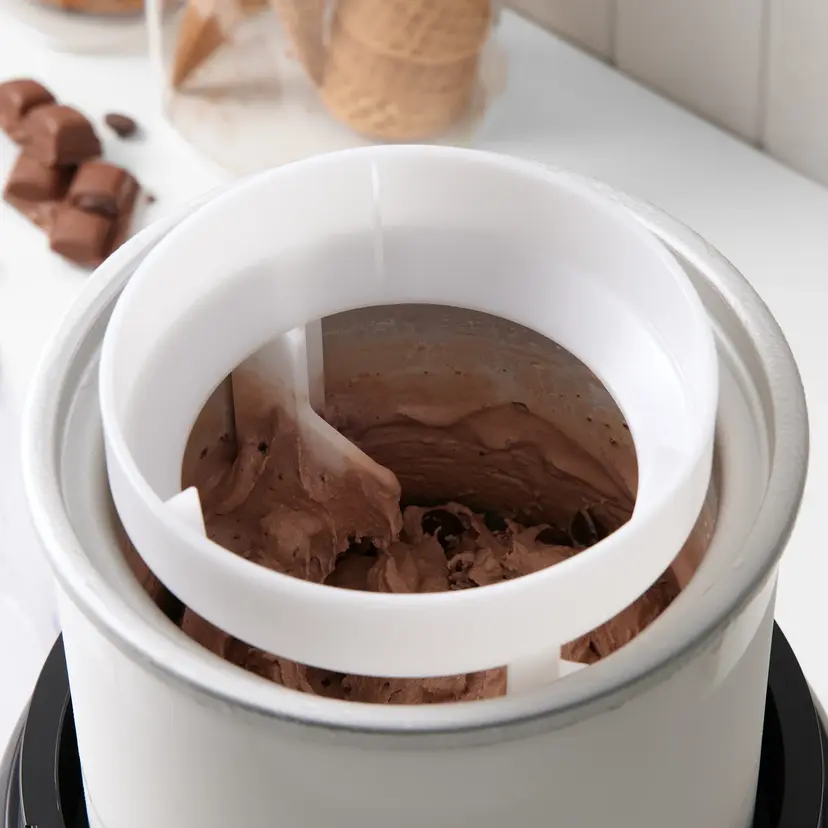
The most common type of pint-sized machine relies on a freezer bowl. This bowl, which you pre-freeze for a significant period, contains a special liquid coolant sealed within its double walls. As the mixture churns inside this super-cold bowl, the coolant rapidly freezes the dairy or fruit base. While some larger, professional-grade machines feature built-in compressors, most personal, pint-sized models favor the simplicity and smaller footprint of the freezer bowl design. This makes them perfect for home use, provided you remember that crucial pre-freezing step!
The Science Behind the Scoop
The magic truly happens during the churning. As the mixture gets colder, tiny ice crystals begin to form. The continuous motion of the paddle (or dasher) scrapes these crystals off the cold walls of the bowl and prevents them from growing too large. This constant agitation is what gives ice cream its smooth, creamy texture. Without it, you’d end up with a solid block of ice, not the luscious scoop you’re dreaming of! It also incorporates air, making the final product lighter and more enjoyable.
Unlocking Perfection: Essential Tips for Using Your Pint Ice Cream Maker
Getting the best results from your pint ice cream maker is surprisingly easy once you know a few key tricks. It’s all about preparation and patience.
Pre-Chilling is Paramount
This is arguably the most critical step for success. If your freezer bowl isn’t cold enough, your ice cream simply won’t set.
- Freezer Bowl: For optimal performance, your freezer bowl needs to be absolutely rock-solid frozen. This often means leaving it in the coldest part of your freezer for a minimum of 15-24 hours. A good test? Give it a shake; if you hear any sloshing liquid inside, it’s not ready yet!
- Mixture: Don’t underestimate the power of a well-chilled base. Your ice cream mixture should be thoroughly refrigerated for at least 4-8 hours before churning. For a quicker turnaround, you can even pre-chill your base in a sealed plastic bag in the freezer for 30-45 minutes, just be careful it doesn’t freeze solid.
The Churning Process
Once everything is perfectly chilled, the real fun begins!
- Start the Machine First: Always turn on your pint ice cream maker before pouring in your mixture. This prevents the mixture from freezing to the sides of the bowl before the churning even begins, which can lead to uneven texture.
- Optimal Churning Time: Most pint makers will churn your base into a soft-serve consistency in about 15-20 minutes. Keep an eye on it; you’ll notice the mixture thicken and increase in volume.
- When to Add Mix-ins: If you’re adding delightful bits like chocolate chips, nuts, or fruit pieces, wait until the last 2-5 minutes of churning. Adding them too early can crush them or interfere with the freezing process.
- Alcohol Alert: If your recipe includes alcohol, be mindful. Alcohol lowers the freezing point, so adding it too early can prevent your ice cream from setting properly. It’s best added towards the very end of the churning process, if at all.
Achieving the Perfect Consistency
Right out of the machine, your homemade ice cream will have a wonderful, soft-serve texture.
- Soft-Serve Immediately: This is when it’s perfect for a quick indulgence!
- “Ripening” for Firmer Ice Cream: If you prefer a firmer, scoopable consistency, transfer your freshly churned ice cream into an airtight container and let it “ripen” in the freezer for another 2-4 hours. This allows it to firm up beautifully without becoming rock-hard.
Beyond the Basics: Care, Maintenance, and Troubleshooting Your Pint Maker
Taking good care of your pint ice cream maker ensures many years of delicious desserts. And don’t worry, even experts encounter a snag or two!
Cleaning Your Machine
Proper cleaning is essential for hygiene and longevity.
- Disassembly: Always consult your manual for specific instructions, but generally, you’ll disassemble the paddle and lid.
- Hand Washing: Most freezer bowls and paddles are not dishwasher safe. Hand wash them with warm, soapy water.
- Drying Completely: Ensure all parts, especially the freezer bowl, are completely dry before storing or placing the bowl back in the freezer. Water droplets can turn into ice and affect future batches.
Common Pitfalls and How to Fix Them
Even with the best intentions, you might run into issues. Here’s how to troubleshoot:
- Icy Texture: This is almost always a sign of insufficient chilling (either the bowl or the mixture), or a recipe with too much water and not enough fat or sugar. Ensure thorough pre-chilling and consider adjusting your recipe for more creaminess.
- Rock-Hard Ice Cream: Homemade ice cream, especially with less air and stabilizers than commercial brands, can freeze very hard. To fix this, simply let your pint sit on the counter for 10-15 minutes or in the refrigerator for 20-30 minutes before scooping.
- Motor Seizing: If the motor stops or struggles, the mixture might be too thick, you might have added too many large mix-ins, or the freezer bowl might not have been churned quickly enough at the start. Ensure your mixture isn’t overfilled and that mix-ins are added gradually and aren’t too large.
Storing Your Homemade Pints
Proper storage is key to preserving that delicious texture and preventing freezer burn.
- Airtight Containers: Always transfer your freshly made ice cream to an airtight, freezer-safe container for storage. This minimizes exposure to air and helps prevent ice crystal formation.
- Plastic Wrap Protection: For an extra layer of protection, press a piece of plastic wrap directly onto the surface of the ice cream before putting on the lid. This creates a barrier against freezer burn.
- Do NOT Store in the Freezer Bowl: Resist the urge to store your ice cream in the machine’s freezer bowl. It will freeze solid to the sides, making it difficult to scoop and potentially damaging the bowl if you use metal utensils.
The Sweet Rewards: Why Own a Pint Ice Cream Maker?
Owning a pint ice cream maker is more than just having another kitchen gadget; it’s an investment in delightful, personalized culinary experiences.
Customization and Health Benefits
“The beauty of a pint ice cream maker,” says Chef Anya Sharma, a renowned pastry chef and frozen dessert specialist, “is the absolute control it gives you over ingredients. You can tailor every spoonful to your dietary needs and taste preferences.” This means you can reduce sugar, experiment with dairy-free alternatives, or load it up with fresh, wholesome ingredients without any artificial additives. It’s perfect for managing allergies or simply enjoying a healthier treat.
Cost-Effectiveness
While the initial investment in your pint ice cream maker is there, it quickly pays for itself. Premium store-bought pints can be quite expensive, especially if you have a gourmet taste. Making your own at home, even with high-quality ingredients, is almost always more budget-friendly in the long run. Imagine the savings over a year!
Small Batches, Big Flavors
One of the greatest advantages of “My Pint Ice Cream Maker” is its ability to create small batches. This means you can experiment with wild and wonderful flavor combinations without committing to a full quart or gallon. Craving a unique lavender honey one day and a rich dark chocolate the next? No problem! It minimizes waste and allows everyone in the household to enjoy their preferred flavor without compromise.
Pint-Sized Masterpieces: Creative Recipes and Serving Ideas
Your pint ice cream maker is a canvas for culinary creativity. Don’t be afraid to experiment beyond the basics!
Classic Creamy Delights
Start with the staples you love:
- Vanilla Bean Dream: A rich custard base infused with real vanilla bean paste.
- Decadent Chocolate Fudge: Made with high-quality cocoa powder and perhaps a swirl of fudge sauce.
Fruity & Refreshing Sorbets/Gelatos
For a lighter, more vibrant treat:
- Berry Blast Sorbet: A blend of fresh strawberries, raspberries, and a hint of lemon.
- Zesty Lemon Gelato: Bright, tangy, and incredibly refreshing.
Unique Flavor Adventures
Dare to be different!
- Cold Brew Coffee Swirl: Infuse your base with strong cold brew, then swirl in some chocolate-covered espresso beans.
- Mint Chip Marvel: A fresh mint base with miniature chocolate chips or chunks.
- S’mores Indulgence: A vanilla base with graham cracker crumbs, mini marshmallows, and chocolate pieces mixed in.
Serving Suggestions
Elevate your pint with creative presentations:
- Topping Bar: Set out bowls of hot fudge, caramel, whipped cream, sprinkles, and chopped nuts.
- Ice Cream Parfaits: Layer scoops of your homemade pint with fruit, granola, or crushed cookies.
- Affogato: Pour a shot of hot espresso over a scoop of vanilla or coffee ice cream. Pure bliss!
FAQs About Your Pint Ice Cream Maker
Here are some common questions many owners have about their pint ice cream maker:
Q: How long does it take to make ice cream in a pint maker?
A: Typically, it takes about 15-20 minutes of churning to reach a soft-serve consistency. For a firmer, scoopable texture, you’ll need an additional 2-4 hours of “ripening” in the freezer.
Q: Can I use sugar substitutes in my pint ice cream maker?
A: Yes, absolutely! Many recipes can be adapted using artificial sweeteners or natural alternatives like stevia or erythritol. Be aware that some substitutes might slightly alter the texture or freezing point, so a little experimentation might be needed.
Q: Why is my homemade ice cream so hard?
A: Homemade ice cream often freezes harder than commercial varieties due to fewer stabilizers and less air whipped in. To make it scoopable, simply let your pint soften on the counter for 10-15 minutes or in the refrigerator for 20-30 minutes before serving.
Q: How do I clean my pint ice cream maker?
A: Most freezer bowls and paddles are best washed by hand with warm, soapy water. It’s crucial to ensure all parts, especially the freezer bowl, are completely dry before storing or refreezing to prevent ice buildup.
Q: What’s the best way to store homemade pint ice cream?
A: Transfer your ice cream to an airtight, freezer-safe container. For added protection against freezer burn, press a piece of plastic wrap directly onto the surface of the ice cream before securing the lid. Avoid storing it in the freezer bowl itself.
Conclusion
Your pint ice cream maker is more than just a kitchen gadget; it’s a passport to a world of creamy, dreamy possibilities, right at your fingertips. From classic vanilla to adventurous new flavors, the power to create delectable frozen treats lies within your grasp. Embrace the process, experiment with ingredients, and most importantly, savor every single spoonful of the personalized frozen masterpieces that only your pint ice cream maker can help you create. Happy churning!